
DaVinci Resolve has become a household name in the world of video editing, especially for those who are serious about color grading. Known for its professional-grade tools and powerful interface, this software is used by filmmakers, content creators, and hobbyists alike. For beginners, though, diving into DaVinci Resolve can feel overwhelming. This guide breaks down the basics of color grading within the platform to help newcomers get started with confidence.
TL;DR
DaVinci Resolve is a professional-grade tool ideal for beginners diving into color grading. It has a node-based system, multiple color tools, and different grading scopes to fine-tune visuals. Starting with the Color page, users should learn the interface, practice with primary correction tools, and gradually explore creative grading. Save often and experiment—color grading is both a science and an art.
Understanding the Color Page
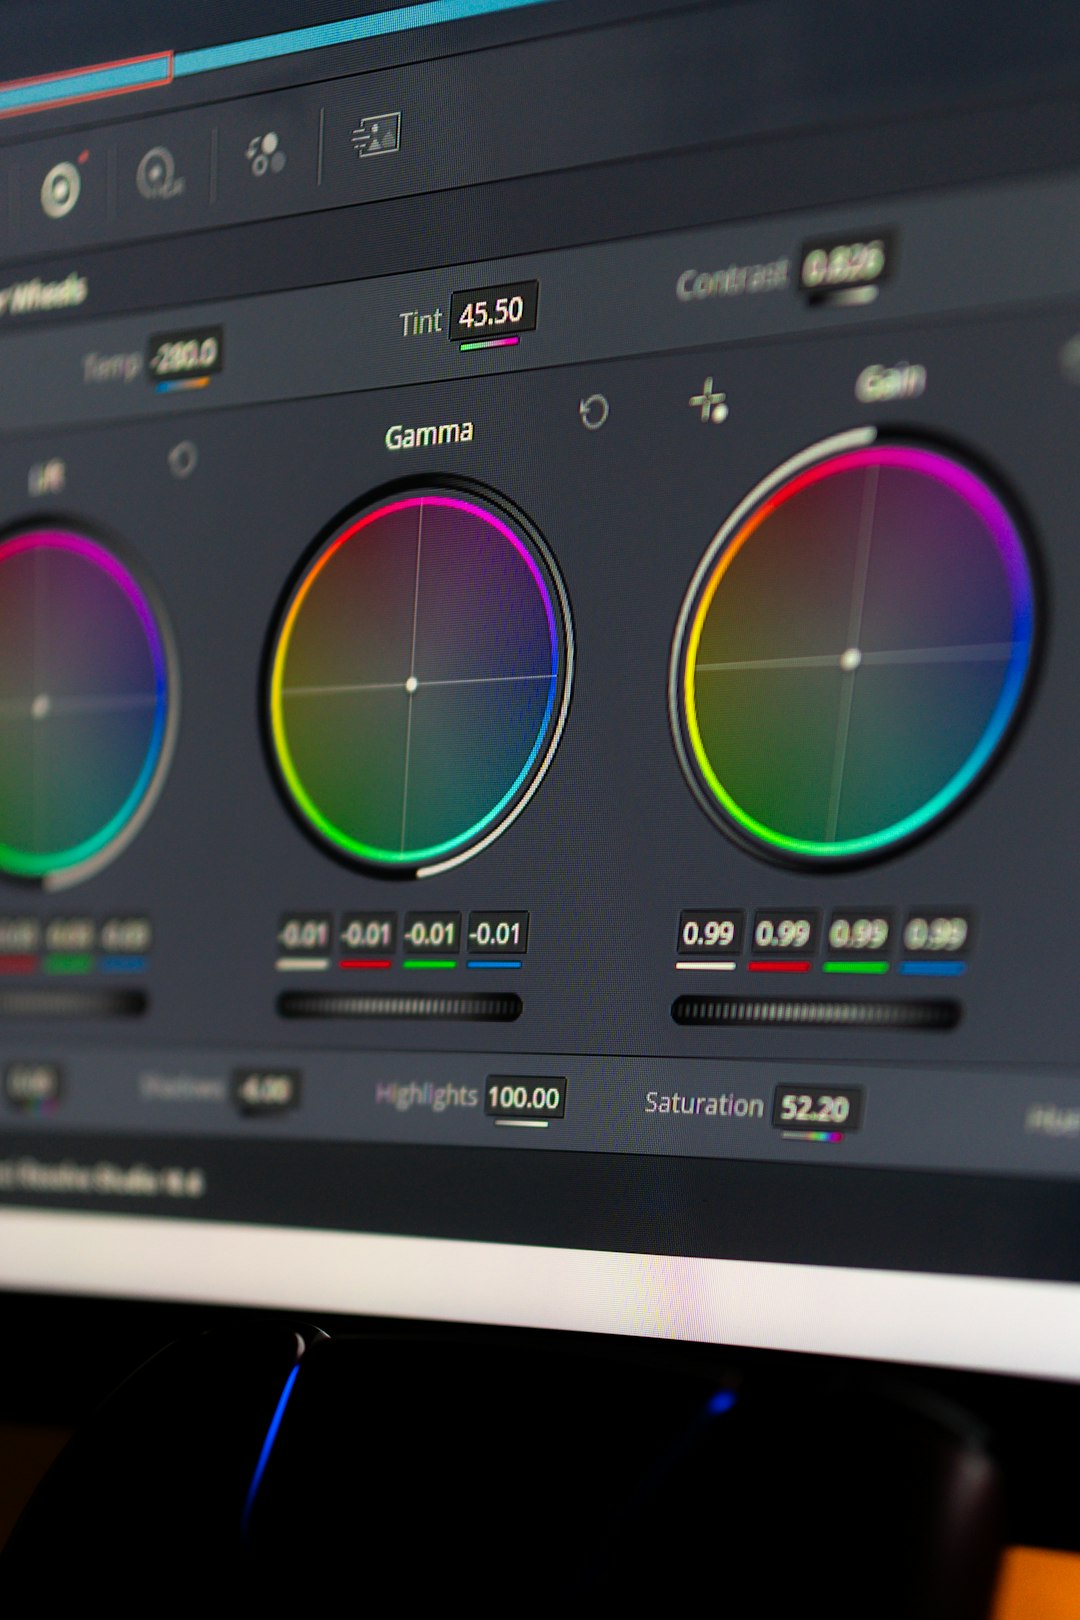
The heart of color grading in DaVinci Resolve lies within the Color Page. This is where the magic happens, from primary corrections to stylized looks. The interface might appear intimidating at first glance, but once you understand what each section does, it becomes incredibly intuitive.
- Viewer: Displays the active clip with all the grading changes applied.
- Node Editor: A workspace where color grading is performed through a node-based system.
- Color Wheels: Used for adjusting lift (shadows), gamma (midtones), gain (highlights), and offset (overall tone).
- Scopes: Tools like waveform, parade, and vectorscope to analyze and balance color and exposure accurately.
Beginners should familiarize themselves with these sections as a foundation before moving on to more complex tasks.
Basic Workflow for Beginners
An effective color grade often follows a general workflow. While artists can process footage in countless ways, sticking to a structure can help beginners stay organized and produce consistent results.
1. Organize and Prepare
Before diving into grading, make sure your project is organized. Use the Media Page to import footages properly, label your clips, and create timelines. If you’re working with camera footage, it’s good practice to apply the correct LUTs (Look-Up Tables) to convert from log to REC.709 color space.
2. Perform Primary Corrections
This is the foundation of your grade. Use the Color Wheels to balance exposure and white levels. Adjust shadows, midtones, and highlights to optimize the dynamic range. Pay attention to the parade and waveform scopes to guide your corrections.
Primary corrections include:
- Exposure adjustments
- Contrast and pivot settings
- Color temperature and tint
These changes ensure that your footage is technically correct and uniform across clips.
3. Use Nodes Effectively
DaVinci Resolve employs a node-based system for color grading. Each node can apply specific corrections or effects. This gives users full control and flexibility.
Start simple:
- Node 1: Primary correction
- Node 2: Contrast adjustment
- Node 3: Creative grading or LUT application
As you grow more comfortable, use serial nodes for step-by-step edits and parallel nodes when isolating effects. Naming nodes can also keep your workflow clean and efficient.

4. Isolate with Qualifiers and Power Windows
Once the basics are in place, you may want to grade specific parts of the image—like a bright sky, a face, or a background. This is where tools like Qualifiers and Power Windows shine.
- Qualifiers: Let you isolate parts of the image based on hue, saturation, and luminance (HSL).
- Power Windows: Allow you to mask off portions of the screen for targeted adjustments.
For instance, if a subject’s face looks underexposed, you can draw a circular Power Window around it and lift the exposure within that area only.
Creative Grading Techniques
With the technical corrections finished, the fun begins. This is your chance to bring character and emotion to your footage. Creative grading includes:
- Applying LUTs: Add film looks or cinematic color palettes.
- Color warping: Adjust specific shades to stylize your footage.
- Grain and film emulation: Add texture and authenticity.
This step is entirely subjective and creative. Exploring different looks can drastically change how your audience perceives the footage.
Useful Tips for Beginners
Color grading is both an art and a science. Here are several tips that will sharpen your skills and help you avoid common pitfalls:
- Use layers of nodes: Separate corrections and styles into different nodes to make revisions easier.
- Reference professional work: Compare your grades to films or TV shows with acclaimed color usage.
- Use scopes constantly: Trusting your eyes is good, but scopes make your grade technically accurate.
- Work on a calibrated monitor: Color accuracy is crucial; a non-calibrated screen can mislead your grading decisions.
- Save often: Resolve autosaves, but getting into the habit of manually saving each stage protects your progress.
Exporting Your Color Graded Work
After your masterpieces are color graded, it’s time to export. Switch to the Deliver Page and choose from various templates optimized for platforms like YouTube, Vimeo, or Final Cut Pro. Customize resolution, codec, bitrate, and audio settings as needed.
Always preview your video after exporting to ensure no grading or compression issues occurred in the render process.
FAQs
-
Q: Is DaVinci Resolve free?
A: Yes, there’s a fully featured free version available, and it includes most of the essential color grading tools. -
Q: What’s the difference between primary and secondary corrections?
A: Primary corrections affect the entire image, like exposure or balance, while secondary corrections target specific areas or colors. -
Q: Do I need a powerful computer to run DaVinci Resolve?
A: Yes, Resolve is resource-intensive. A good GPU, plenty of RAM, and a fast processor are recommended. -
Q: Can I use plugins inside the Color Page?
A: Absolutely. Resolve supports OpenFX plugins and third-party tools that can expand your creative options. -
Q: How do I match colors between multiple clips?
A: Use the Color Match tool or manually balance using scopes and by copying grades between clips with similar lighting.
By focusing on building a solid foundational understanding of color grading in DaVinci Resolve, beginners can quickly elevate their video work to professional levels. The key is to practice often, stay curious, and learn from both mistakes and masterpieces.
